


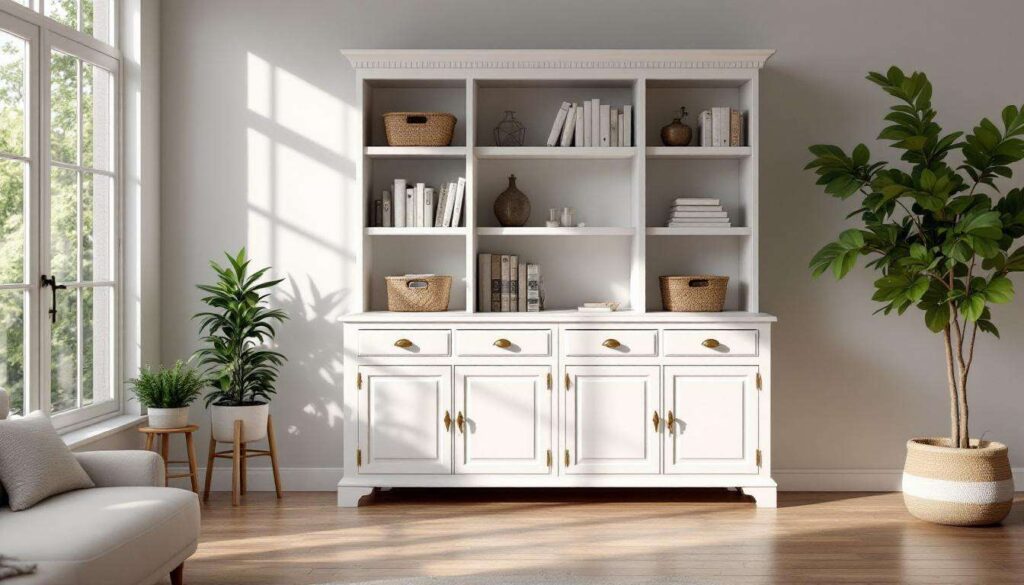
Repurposing vintage furniture pieces offers an excellent opportunity to create functional storage whilst preserving character and craftsmanship. An old hutch top, often separated from its base through years of use or design changes, presents remarkable potential as a standalone storage cabinet. With thoughtful restoration and creative vision, these architectural remnants can be transformed into practical organisational solutions that blend seamlessly with contemporary or traditional interiors. The process requires careful selection, proper preparation, and strategic modifications to maximise both aesthetic appeal and utility.
How to choose the perfect old hutch top
Assessing structural integrity and dimensions
Before committing to a hutch top transformation project, thorough structural evaluation ensures your investment of time and resources yields lasting results. Examine the piece carefully for signs of woodworm, extensive rot, or compromised joinery that might render restoration impractical. Check that doors open smoothly, shelves remain level, and the frame maintains squareness without significant warping.
Measure the hutch top dimensions precisely to determine where it will fit in your home. Consider these essential measurements:
- Overall height, width, and depth including any protruding elements
- Internal shelf spacing and adjustability options
- Door clearance requirements for proper opening
- Distance between mounting points if wall installation is planned
Identifying desirable design features
The most successful transformations begin with pieces that possess inherent character and quality construction. Look for solid wood construction rather than particleboard or veneer-covered materials, as these offer greater durability and refinishing possibilities. Original glass panels, decorative mouldings, and carved details add visual interest that enhances the finished cabinet.
| Feature | Advantage | Restoration Consideration |
|---|---|---|
| Glass doors | Display capability | Replacement glass may be needed |
| Adjustable shelving | Flexible storage | Verify peg holes are intact |
| Deep interior | Increased capacity | May require additional lighting |
| Ornate hardware | Authentic character | Clean or replace as needed |
Understanding these structural and aesthetic elements helps guide the selection process towards pieces that will serve your storage needs effectively whilst requiring manageable restoration efforts.
Preparation and cleaning before transformation
Dismantling and initial assessment
Begin by carefully removing all hardware, including hinges, handles, knobs, and decorative elements. Label each component and store them in marked containers to facilitate reassembly. This step allows thorough cleaning of both the furniture and the fittings whilst preventing damage during the restoration process. Photograph the original configuration to reference during reconstruction.
Remove shelves, backing panels, and any loose components. Inspect each element individually for damage, noting repairs needed before proceeding with cleaning and refinishing stages.
Deep cleaning techniques for vintage wood
Accumulated grime, grease, and old polish require gentle yet effective cleaning methods that preserve the wood’s integrity. Create a solution of warm water with mild dish soap, using a soft cloth wrung nearly dry to avoid saturating the wood. Work in small sections, wiping in the direction of the grain.
For stubborn residue, consider these targeted approaches:
- Mineral spirits for sticky adhesive remnants and old wax build-up
- White vinegar solution for water stains and mild discolouration
- Fine steel wool with furniture oil for ingrained dirt in carved details
- Soft-bristled toothbrush for reaching intricate mouldings and corners
Addressing repairs and surface preparation
Once clean, assess the surface condition to determine the level of refinishing required. Fill any cracks, gouges, or missing veneer sections with appropriate wood filler, selecting colours that match the existing wood tone. Sand filled areas smooth once dry, progressing through increasingly fine grits.
If the existing finish remains sound with only minor wear, a thorough cleaning followed by fresh wax or oil may suffice. However, pieces with extensive finish damage benefit from complete stripping and refinishing. This preparation stage establishes the foundation for both structural improvements and aesthetic enhancements that follow.
Steps to transform the hutch top
Creating a stable base or mounting system
Since hutch tops originally rested upon lower cabinets, establishing proper support becomes essential for standalone functionality. Several approaches accommodate different placement scenarios and structural requirements.
For floor-standing installation, construct a simple plinth base from dimensional lumber that matches the hutch footprint. Attach the base securely using brackets and screws driven into solid frame members. Alternatively, source furniture legs in appropriate style and height, mounting them with corner brackets and threaded inserts for stability.
Wall-mounting offers space-saving advantages whilst creating a floating appearance. Locate wall studs precisely and install a French cleat system or heavy-duty brackets rated for the cabinet’s weight plus anticipated contents. Ensure mounting hardware penetrates studs by at least 50mm for adequate support.
Refinishing and protective coating application
The refinishing approach depends on your desired aesthetic outcome and the piece’s current condition. Traditional wood finishes such as oil-based stains followed by polyurethane provide durability whilst showcasing natural grain patterns. Apply stain evenly with foam brushes or lint-free cloths, wiping excess before it dries to prevent blotching.
For painted finishes that complement modern interiors:
- Prime all surfaces with quality bonding primer suitable for furniture
- Apply two to three thin coats of furniture-grade paint rather than single heavy applications
- Sand lightly between coats with 220-grit paper for smooth results
- Seal with clear topcoat for enhanced durability in high-use areas
Hardware installation and functional upgrades
Reinstall original hardware after cleaning and polishing, or replace with new pieces that enhance functionality. Modern soft-close hinges eliminate slamming whilst preserving period aesthetics when properly installed. If original knobs or pulls show excessive wear, source reproduction hardware that maintains stylistic consistency.
Consider adding interior lighting to illuminate contents and create ambiance. Battery-operated LED strips install easily without electrical modifications, whilst hardwired solutions offer permanent illumination for frequently accessed storage. These functional enhancements prepare the cabinet for its new role as purposeful storage.
Functional storage ideas for your cabinet
Kitchen and dining organisation solutions
Transformed hutch tops excel as dedicated storage for dining essentials and culinary items. The enclosed upper sections protect delicate glassware and china from dust whilst displaying treasured pieces behind glass doors. Adjust interior shelves to accommodate varying heights of serving platters, cake stands, and decorative vessels.
Maximise kitchen storage potential with these organisational strategies:
- Install hooks beneath shelves for hanging coffee mugs or tea cups
- Add wine glass racks to utilise overhead space efficiently
- Incorporate basket inserts for corralling small items like napkin rings
- Designate specific zones for categories such as baking supplies or entertaining items
Home office and craft supply organisation
The compartmentalised nature of hutch cabinets provides excellent organisation for creative pursuits and administrative tasks. Dedicate shelves to reference books, binders, and archived documents whilst using drawers or baskets for supplies. Glass-fronted sections allow quick visual inventory of materials without opening doors.
| Storage Zone | Recommended Contents | Organisation Method |
|---|---|---|
| Upper shelves | Reference materials, display items | Bookends, decorative boxes |
| Middle section | Frequently accessed supplies | Clear containers, labelled bins |
| Lower area | Bulky equipment, paper stock | Rolling bins, magazine files |
Bathroom and linen storage applications
Repurposed hutch tops bring vintage charm to bathroom storage whilst providing ample capacity for towels, toiletries, and grooming essentials. The enclosed design protects linens from moisture and dust, maintaining freshness between uses. Install the cabinet at appropriate height for convenient access whilst ensuring adequate clearance from plumbing fixtures.
These practical considerations enhance bathroom functionality whilst the cabinet’s decorative presence elevates the space beyond purely utilitarian design.
Adding decorative touches for a unique look
Interior backing and shelf enhancements
Transform the cabinet’s interior with decorative backing materials that add visual interest when doors open. Wallpaper remnants in complementary patterns create sophisticated backdrops for displayed items. Alternatively, paint interior backs in contrasting colours that highlight contents whilst adding unexpected colour pops.
For textured interest, consider beadboard paneling, fabric panels stretched over mounting boards, or even mirrors that reflect light and create depth perception. These interior treatments distinguish your piece from standard storage solutions.
Exterior embellishments and hardware upgrades
Personalise the cabinet’s exterior through carefully selected decorative elements that reflect your aesthetic preferences. Apply decorative mouldings to plain door panels, creating raised panel effects that suggest higher-end craftsmanship. Stenciled designs, hand-painted motifs, or decoupage techniques offer artistic expression whilst maintaining functionality.
Hardware selections dramatically influence overall style:
- Brass or bronze pulls evoke traditional elegance
- Matte black hardware provides contemporary contrast
- Crystal or glass knobs add feminine sophistication
- Leather pulls introduce organic warmth and texture
These finishing touches establish the cabinet’s character whilst ensuring it harmonises with surrounding décor.
Maintenance tips and durability of the transformed furniture
Regular cleaning and protective care
Preserve your transformed cabinet through consistent maintenance practices that prevent deterioration and maintain appearance. Dust surfaces weekly with microfiber cloths that capture particles without scratching finishes. For painted surfaces, occasional cleaning with barely damp cloths removes fingerprints and smudges without compromising the coating.
Wood finishes benefit from periodic conditioning with appropriate products. Oil-finished pieces require reapplication every six to twelve months, whilst waxed surfaces need buffing and fresh wax annually. Polyurethane-sealed cabinets need only routine cleaning unless damage occurs.
Addressing wear and preventing damage
Monitor high-contact areas such as door edges, handles, and shelf fronts for signs of finish wear. Address minor damage promptly before it expands, touching up paint chips or applying finish repair markers to scratched wood areas. Preventive measures extend the cabinet’s lifespan significantly.
Protect surfaces from excessive moisture, direct sunlight, and temperature extremes that cause wood movement and finish degradation. Use shelf liners to prevent scratching from stored items, and avoid overloading shelves beyond their weight capacity. Tighten hardware connections periodically to maintain structural integrity.
Repurposing an old hutch top into functional storage combines sustainable practice with creative expression. Through careful selection, thorough preparation, and thoughtful transformation, these vintage pieces gain new purpose whilst retaining historical character. The resulting cabinet provides practical organisation tailored to specific needs, enhanced by decorative touches that reflect personal style. With proper maintenance, your transformed furniture will serve reliably for years, proving that quality craftsmanship transcends its original context.